Tuesday, October 9, 2012

Finish Along

I joined the 100 Day Hustle last week and I've already crossed a couple of things off that list, but I also wanted to join the Finish Along at Quilter in the Gap.  My WIP pile is embarrassingly large and I don't know how much of this I can finish by the end of the year, but it would sure be nice to "clean the slate" for the new year.
 
1. Bind the HST-Warm/Cool quilt
 
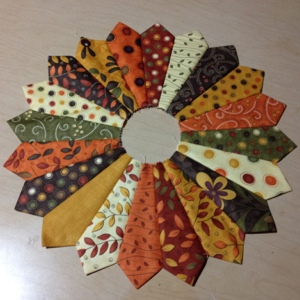
2. Dresden Plate table runner.  Wouldn't this be pretty on our Thanksgiving Table?
 
3. Spin Cycle quilt.  This should also be done by Thanksgiving so I can gift it to the lovely hosts of our annual pre-Turkey-day-pie-night. Blocks are done. Pattern by Allison of Cluck, Cluck, Sew.

 
4. Christmas Star quilt. Done by December, or Christmas at least.
 
5. Vintage Holiday quilt.  I have been a good girl and haven't even cut this one out, but I dream about it everyday and would like to finish it for Christmas decorating.
 
6. Advent Calendar.  Guess I better get this one done before December.
 
7. Abandoned Swoon blocks in Christmas colors need to become some table toppers.
 
8. I could not resist these scrappy log cabins and might join in the Scrappy Stash Quilt Along at Ellison Lane Quilts.  A finished quilt must be done by November 13 . . . hmmmm.
 
A few more things that I probably won't get done this year, but I'll add them to the list just in case.
 
9. Terrain Hexagon quilt.  I'd like to finish this so I can feel free to use the left overs for other projects.
 
10. Not Your Granny's Bee blocks will be exchanged this weekend.  I made a set of red/yellow ones too and will end up with a stack of charcoal-background blocks and white-background blocks. Do you think I could mash them together all in the same quilt???
 
11. Polaroid Block swap.  These little babies were fun to make and swap, but I'm not certain what to do with them now.
 
12. A red and white HST quilt.  This one stalled, but will be stunning if I ever finish it.
 
13. NuBee's Block Swap.  Red, white and blue.  If anyone wants to swap me something for that yellow and gray block in front, make me an offer. . . I made it for someone who dropped out and I'll never use it.
 
Well, that's quite a list.  There are a few more in the pile that I politely ignored, but this should be good for getting on with.
 

Friday, October 5, 2012

Halloween Pillows

Happy Halloween!
 
I finished up some pillows from some patchwork that I made 2 or 3 years ago.  (These pieces have been pinned to my cork board, staring me in the face for far too long.)
 

I'm practicing my "swirl" free-motion quilting and getting more confident with each attempt.


Fat quarters of a Riley Blake print for the backs, with a zipper! I only had to unpick and throw away one zipper. *wink*

 
My 2-year-old attempted to take one to bed last night.
 

Whoooo Are You?

 
A mini inspired by this quilt block that was inspired by this tutorial.
 
 
Fabric: Dots from Riley Blake that I purchased at Westwood Acres on Etsy (great customer service and a well-curated selection of fabrics) and Kona Medium Gray.  Bound in Kona Coal.
Quilting: Free-motion "Allover Leaves" from Free-Motion Quilting with Angela Walters
Finished Size: about 14" x 14"
Finished Date: October 3, 2012
 
Did I drop enough names there?

Thursday, October 4, 2012

NuBees Quilting Bee

This summer, I spent a few months in the NuBees Quilting Bee on Flickr.  This is a great block swap for new swappers and has a quick turn around time . . . no waiting months for it to be your turn.  Each member of the hive chooses their own colors and then each hive member makes a block of their choice in everyone's colors with fabric from their stash.
 
For the three months I was in the swap, I chose red, white and blue.
 
The first month, I made the star-crossed block by Elizabeth of Don't Call Me Betsy.
 
 
Here are the blocks I got in return.
 
 
Month number 2, I modified the Stacked Quilt Block to make it a 12.5" block.
 
 
And for my final month, I made this block below and now I'm not certain where I saw it.  It's pretty simple, since it is just half-square triangles.  One swapper asked for a pop of color, so I added the little square in the middle on that bottom right.  I had saved it 'til last because I wasn't certain how to add the pop, but it ended up being my favorite block.
 
 
For the most part, I really enjoyed the process and challenge of being in a Bee.  I had to stretch out of my color comfort zone frequently and was always anxious to make something that would please my hive-mates.  I felt it was important to do my best work and use quality fabrics.
 
Sadly, the blocks I've received in return have been added to the WIP pile . . . someday, they'll see the light of day. I should make it my goal to have it done by next July so we can use it for our Independence Day fireworks.

Wednesday, October 3, 2012

Quilting the HST-Warm/Cool Quilt

I finished quilting my HST-Warm/Cool Quilt this morning (I really need help coming up with a better name for this quilt!!!) and wanted to share my process in quilting this quilt.
 
I was lucky enough to win a copy of Free-Motion Quilting with Angela Walters directly from the lovely Angela Walters herself.  I've studied this book for weeks and wanted to try several of the techniques she teaches in this book.
 
 
For much of the process, this is how I worked.  That book was open right next to my machine and I copied each motion directly from there.  Here instructions are so clear and simple . . . step-by-step and easy to follow.
 
 
My original strategy was going to be to try differnt loopy and roundish designs in the warm sections and different geometric and squarish designs in the cool sections, but I was worried that would be way too busy.  I still wanted to try lots of different techniques, so I decided to use "back and forth" for the cool sections and a variety in the warm sections.
 
Angela teaches to pick just a couple of designs.  Now that I'm done, I totally agree.  I think this quilt would have looked more stunning if I had picked just 2 or 3 designs.  However, I'm glad I tried lots of them . . . I now have the confidence to use them on other quilts.
 
Here's how I started: I quilted a large "flower power" design in the center box. (All design names come from the book.)  "Back and forth" in the first and subsequent cool section.  And then "basic swirls" in the first warm diamond.  My sections are pretty narrow, so I realized quickly that it is a challenge to use an all-over design in a narrow space . . . I just didn't know how to correct that.  I finally figured it out several rows later.  It has to do with scale.  If I were the kind of person who likes to unpick, that swirl section would go, but I'm happy being perfectly flawed.
 
 
The next warm round shown below, I used the "paisley" design.  I love the look of this one and found my rhythm pretty quickly.  This is probably the one I would use to alternate with the "back and forth" on an entire quilt.
 
Or maybe this next design: "wavy lines".  These horizontal lines contrasted in such a stunning way with "back and forth" and were pretty easy to do.
 
 
The next row is "figure 8" and took my brain a little while to get wrapped around.  Once I found my rhythm this was a simple, quick design.
 
The following row is a line of "flower power".  This is another one I wish I could pick out on this quilt.  It is pretty dense compared to the other designs, but would look stunning as an all-over design on a quilt.
 
 
The next row (the bottom "v" shape below) is where I finally figured out scale.  This is a line of "swirled hook" and this is where I had the book right on my machine to copy every movement.  This design can be used as an all-over design, but if you increase the scale, it can easily be used in a line.
 
The last warm row down below is a "double loop swirl"
 
 
Here, my rounds ended, but there were some sections out to the side where I could try a few more designs.  In the photo below, you can see the "swirled hook" and "double-loop swirl" again and then . . .
 
There's my first attempt at "pebbles".  I really wanted to practice this design because I want to use it on the pathway for my Grandmother's Flower Garden.  It wasn't as hard as I thought it would be.
 
The next row is another example of changing the scale of an all-over design and stretching it into a line.  Angela does a great job of explaining this and calls it a "swirl scroll".
 
On the last two rows, I repeated "paisley" and "wavy lines" just to get 'er done.
 
 
Overall, I'm pretty pleased with how this crazy quilt turned out.  I'm glad I took the opportunity to learn some new techniques, but here's some things I learned:
 
1. Stick to 2 or 3 designs as Angela suggests.
2. Change the scale for a better look.  Don't be afraid to go big.
3. Don't be afraid to try new things.  You never know if you can or can't do something until you try.
 
Now, I'm off to figure out what to bind this busy quilt in (and try to find a more clever name for it.)
 
I'm linking up to Lee's WIP Wednesday since this is what I'm working on this week.
 
Grab a button:

Tuesday, October 2, 2012

Happy Halloween

Another quilt that was finished last year during a blogging hiatus.
 
A Halloween Kaleidoscope Quilt
 

I saw several quilts in blogland a few years ago that used black and orange prints (like this one and this one and this one) and needed to make my own.  At the time, attempts at a bit of wonkiness frightened me, so I found a great, old-fashioned Kaleidoscope pattern (it's been so long, I don't remember where the pattern came from . . . the blocks finish at 12") and got to work.


Now, part of the success of those other quilts is that they didn't use novelty prints (or very little of them), but used the color to express the Halloween theme.  I, however, had bought Halloween prints on sale and so that's what I used.
 

The back was pieced together using leftovers from the front.  And can you a bit of the quilting just below the row of black rectangles?  Does it look like a spider web?


Yep, a spider web.  I wish you could see it better.  I started in the center of one of the blocks that was up and to the left a bit.  I used the lines radiating out from the center of that block to create the spokes of my web.  In a spiral, starting from the center, and about 1-1/4" apart, I free-motioned a spider web.


And what's a spider web without spiders?  In the space that was left to the right and across the bottom of the the web, I quilted a broad meander and several large spiders, as though they were dangling from the web.


Quilt Stats:
Fabric: Wide variety of novelty and geometric black and orange prints.
Pattern: Traditional Kaleidoscope that finishes at 12"
Binding: Various black prints.
Finished size: 60" x 72"
Finished date: November, 2011 


Happy Halloween.

Monday, October 1, 2012

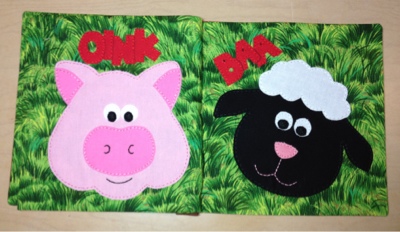
A Farm Quiet Book

Another little quiet book.  This one is about 6" square.  The patterns come from the Cricut cartridge "Animal Kingdom". I used fusible web to adhere the pieces and then hand embroidered around the raw edges.  I actually made two of these and used my sewing machine on the other . . . much faster!
 
 
Much loved by a precious 2-year-old.