Wednesday, October 3, 2012

Quilting the HST-Warm/Cool Quilt

I finished quilting my HST-Warm/Cool Quilt this morning (I really need help coming up with a better name for this quilt!!!) and wanted to share my process in quilting this quilt.
 
I was lucky enough to win a copy of Free-Motion Quilting with Angela Walters directly from the lovely Angela Walters herself.  I've studied this book for weeks and wanted to try several of the techniques she teaches in this book.
 
 
For much of the process, this is how I worked.  That book was open right next to my machine and I copied each motion directly from there.  Here instructions are so clear and simple . . . step-by-step and easy to follow.
 
 
My original strategy was going to be to try differnt loopy and roundish designs in the warm sections and different geometric and squarish designs in the cool sections, but I was worried that would be way too busy.  I still wanted to try lots of different techniques, so I decided to use "back and forth" for the cool sections and a variety in the warm sections.
 
Angela teaches to pick just a couple of designs.  Now that I'm done, I totally agree.  I think this quilt would have looked more stunning if I had picked just 2 or 3 designs.  However, I'm glad I tried lots of them . . . I now have the confidence to use them on other quilts.
 
Here's how I started: I quilted a large "flower power" design in the center box. (All design names come from the book.)  "Back and forth" in the first and subsequent cool section.  And then "basic swirls" in the first warm diamond.  My sections are pretty narrow, so I realized quickly that it is a challenge to use an all-over design in a narrow space . . . I just didn't know how to correct that.  I finally figured it out several rows later.  It has to do with scale.  If I were the kind of person who likes to unpick, that swirl section would go, but I'm happy being perfectly flawed.
 
 
The next warm round shown below, I used the "paisley" design.  I love the look of this one and found my rhythm pretty quickly.  This is probably the one I would use to alternate with the "back and forth" on an entire quilt.
 
Or maybe this next design: "wavy lines".  These horizontal lines contrasted in such a stunning way with "back and forth" and were pretty easy to do.
 
 
The next row is "figure 8" and took my brain a little while to get wrapped around.  Once I found my rhythm this was a simple, quick design.
 
The following row is a line of "flower power".  This is another one I wish I could pick out on this quilt.  It is pretty dense compared to the other designs, but would look stunning as an all-over design on a quilt.
 
 
The next row (the bottom "v" shape below) is where I finally figured out scale.  This is a line of "swirled hook" and this is where I had the book right on my machine to copy every movement.  This design can be used as an all-over design, but if you increase the scale, it can easily be used in a line.
 
The last warm row down below is a "double loop swirl"
 
 
Here, my rounds ended, but there were some sections out to the side where I could try a few more designs.  In the photo below, you can see the "swirled hook" and "double-loop swirl" again and then . . .
 
There's my first attempt at "pebbles".  I really wanted to practice this design because I want to use it on the pathway for my Grandmother's Flower Garden.  It wasn't as hard as I thought it would be.
 
The next row is another example of changing the scale of an all-over design and stretching it into a line.  Angela does a great job of explaining this and calls it a "swirl scroll".
 
On the last two rows, I repeated "paisley" and "wavy lines" just to get 'er done.
 
 
Overall, I'm pretty pleased with how this crazy quilt turned out.  I'm glad I took the opportunity to learn some new techniques, but here's some things I learned:
 
1. Stick to 2 or 3 designs as Angela suggests.
2. Change the scale for a better look.  Don't be afraid to go big.
3. Don't be afraid to try new things.  You never know if you can or can't do something until you try.
 
Now, I'm off to figure out what to bind this busy quilt in (and try to find a more clever name for it.)
 
I'm linking up to Lee's WIP Wednesday since this is what I'm working on this week.
 
Grab a button:

Tuesday, October 2, 2012

Happy Halloween

Another quilt that was finished last year during a blogging hiatus.
 
A Halloween Kaleidoscope Quilt
 

I saw several quilts in blogland a few years ago that used black and orange prints (like this one and this one and this one) and needed to make my own.  At the time, attempts at a bit of wonkiness frightened me, so I found a great, old-fashioned Kaleidoscope pattern (it's been so long, I don't remember where the pattern came from . . . the blocks finish at 12") and got to work.


Now, part of the success of those other quilts is that they didn't use novelty prints (or very little of them), but used the color to express the Halloween theme.  I, however, had bought Halloween prints on sale and so that's what I used.
 

The back was pieced together using leftovers from the front.  And can you a bit of the quilting just below the row of black rectangles?  Does it look like a spider web?


Yep, a spider web.  I wish you could see it better.  I started in the center of one of the blocks that was up and to the left a bit.  I used the lines radiating out from the center of that block to create the spokes of my web.  In a spiral, starting from the center, and about 1-1/4" apart, I free-motioned a spider web.


And what's a spider web without spiders?  In the space that was left to the right and across the bottom of the the web, I quilted a broad meander and several large spiders, as though they were dangling from the web.


Quilt Stats:
Fabric: Wide variety of novelty and geometric black and orange prints.
Pattern: Traditional Kaleidoscope that finishes at 12"
Binding: Various black prints.
Finished size: 60" x 72"
Finished date: November, 2011 


Happy Halloween.

Monday, October 1, 2012

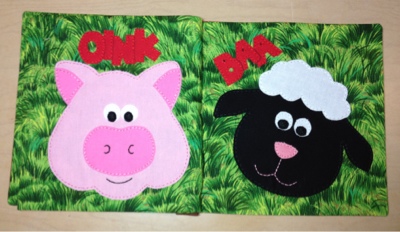
A Farm Quiet Book

Another little quiet book.  This one is about 6" square.  The patterns come from the Cricut cartridge "Animal Kingdom". I used fusible web to adhere the pieces and then hand embroidered around the raw edges.  I actually made two of these and used my sewing machine on the other . . . much faster!
 
 
Much loved by a precious 2-year-old.

Tuesday, September 25, 2012

Joining The 100 Day Hustle

I definitely need some motivation to shrink my WIP pile and saw this fun link-up.

Kelsey Sews

Essentially, there are 100 days from the first day of fall (Sept. 22) until the end of the year.  The goal is to "clean the slate" for the beginning of the new year.  Here's my extensive list of WIPs that I would like to be finish so I can feel the freedom to create in 2013.

1. Finish quilting the HST quilt (and come up with a better name *wink*) and get it bound.


2. Whoooo Are You Mini.  I broke my resolve and started something new before the above quilt was done.  Now it is another WIP (hang my head in shame).


3. Halloween Table Runner.  I just need to get this one bound.

4. Thanksgiving Dresdens.  This might be a 2-year WIP.  I'd love to finish it so I feel free to use the left overs for other fun designs.

5. Christmas Stars Quilt.  This one is buried . . . deep.  I think the blocks are close to being finished.  I'd love to cuddle under it by December.

6. Vintage Christmas.  This is such an adorable and simple pattern.  I'd love to have this one done for Christmas too.


7. Christmas Advent Calendar.  I have a tree pieced and all the ornaments done; I just need to design what goes around the tree and get 'er done.

8. Terrain Hexagon Quilt.  I don't know if my resolve is strong enough to get this one done soon, but I'll add it to the list . . . maybe that will be good motivation.


9. Lots of Bee Blocks: Not Your Granny's Bee, NuBees, and Polaroids . . . all need to be put to use.

There're others rattling in my brain, but perhaps if I get this list finished, I can get started on those in the new year.  I have an idea for a quilt made of lots and lots of pieced trees and another made of words, but I must, must, must reduce this WIP pile first.  Here's to a productive 100 last days of 2012. 

Tuesday, September 18, 2012

I Spy Quilt Finish

My I Spy Snowball Quilt is finally complete.  I exchanged 5" I Spy charms through several flickr swaps and private trades, adding to my already extensive stash of novelty prints to end with 300 charms for a twin size quilt.
 
 
Backed with a robot print from JoAnns (gasp, I know).  Joe has been watching Wall-E lately, so he thinks these are Wall-E and Eve.
 
 
Straight line quilting and striped binding, channeling Rita of Red Pepper Quilts . . . man that woman has mad skills.  I, on the other hand, apparently, cannot sew a straight line to save my life.  But like my mom always says, "It looks good from the stage."
 
 
And here's the munchkin for whom it is intended.  He'll be turning 2 next week, and this quilt will eventually be for a "big boy bed" . . . but since I've been through this before and he's my baby, I'm dragging out the crib entrapment for as long as I can *insert evil cackle here*.
 
 
Quilt Stats:
Pattern: Traditional Snowball (5" starting square, 2" squares sewn across the diagonal for the corners . . . may have done the calculations wrong, needing to cut the 2" on the diagonal and then sew with a 1/4" seam, but I didn't know how to line it up, so 2" squares it was.)
Fabric: A wide assortment of novelty charms, Kona White
Backing: Robot print from JoAnns
Binding: Red/White stripe from the Dr. Suess collection by Robert Kauffman
Finished Size: 68" x 90" (generous twin)
Finished Date: Today! September 18, 2012

Thursday, September 13, 2012

A Quilting Beginning

I've been so inspired by Diane's new linky party where you post about the beginning of a project.  Since I'm almost finished quilting my I Spy quilt, I've been thinking about beginning the quilting on this HST-warm/cool quilt. 
 
 
The top has been done for a while now, but set aside in fear of how to quilt it.  I was lucky enough to win a copy of Angela Walter's new book, Free-Motion Quilting.  This book is amazing and has so many ideas.
 
 
I think I'm going to emphasize the diamond design by stitching a new pattern in each round.  I was even thinking of trying curvy patterns in the warm sections and more geometric-squarish patterns in the cool sections.  This will be a great opportunity to try out some of the designs on an already busy quilt.
 
I'm going to finish up that I Spy quilt, hopefully, today and get this basted over the weekend.  Here's to new beginnings.  Thanks, Diane, for some motivation!  Linking up at from the blank pages.